I spent a long time being scared of the smoky eye. Every time I tried it, I ended up looking less “seductive” and more “I walked into a door.” The colours were muddy, the blending went sideways, the liner ended up halfway down my face. I thought the look just wasn’t for me.
Turns out I was just doing it wrong. The smoky eye has about three actual rules, and once you know them, it’s genuinely one of the easier looks to pull off. Here’s what I wish someone had told me earlier.
Start with primer. No, it’s not optional.
Eye primer is the step everyone skips and then wonders why their shadow creases by noon. A tiny dot of primer on each lid, blended in with your finger, takes ten seconds and makes the rest of the work last all day. Urban Decay Eyeshadow Primer Potion is the standard recommendation for a reason — it’s cheap, it works, and one tube lasts forever.
If you don’t have primer, a thin layer of concealer patted onto the lid and set with a tiny bit of translucent powder works in a pinch. Not as good, but better than nothing.
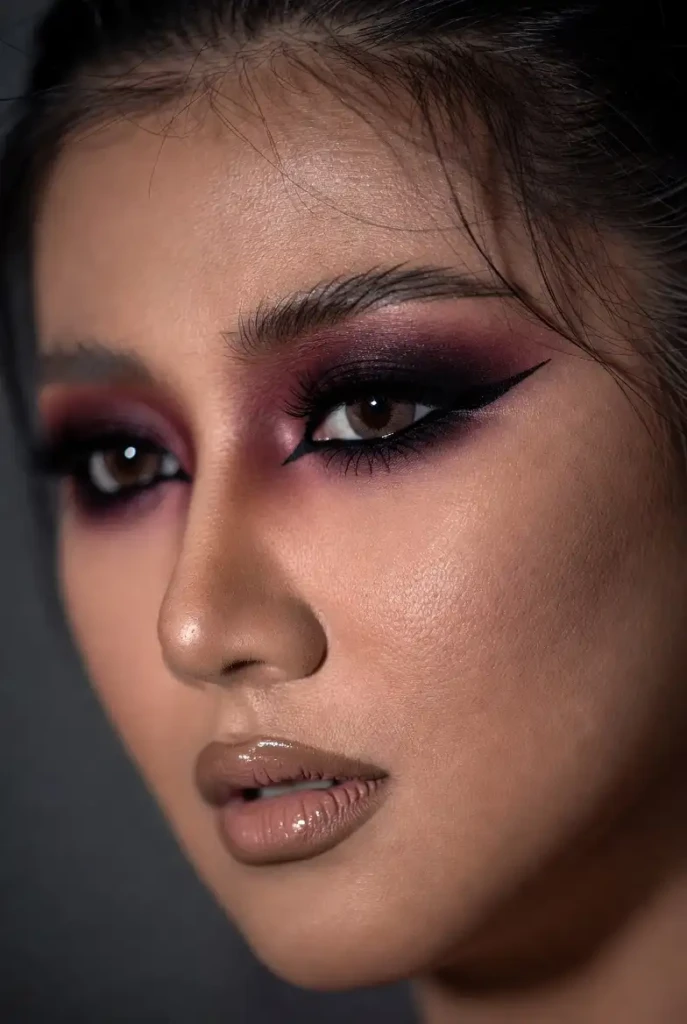
Pick three shades, not one
This is the part that trips people up. A smoky eye isn’t just dark eyeshadow smeared on the lid. It’s three shades working together: a light base, a medium transition shade, and a dark colour for depth. The light keeps it from looking flat. The transition shade does the blending work. The dark creates the drama.
Classic black smoky: light champagne on the lid, medium taupe in the crease, black or dark grey on the outer corner and lower lash line. This is the version that works on everyone.
Brown smoky: warmer and softer. A cream or gold base, a warm brown mid-tone, deep chocolate or burgundy for depth. Better for daytime or if black feels too severe for your colouring.
Coloured smoky: same structure, different palette. Navy and silver. Plum and rose gold. Forest green and bronze. The three-shade rule still applies, just shift the whole palette.
Build up slowly — this is not the time to be bold from the start
Start with the lightest shade and cover the whole lid. Then pick up the medium shade and work it into the crease, using a windshield-wiper motion back and forth. Then the dark shade goes on the outer corner only, in a V shape. Blend the edges of the dark shade upward and outward into the medium.
The whole point is that you should not be able to see where one colour ends and the next begins. That’s what blending is. Use a clean fluffy brush to soften any harsh lines. If it looks too dark, pat a little of the medium shade over it to diffuse.
Take your time here. Ten minutes of patient blending beats thirty seconds of aggressive application every single time.
The liner situation
You have options. A pencil liner smudged along the lash line gives a softer, more diffused result. Gel liner gives sharper definition. Liquid liner on a smoky eye usually reads as too harsh unless you’re going for a very specific editorial look.
For the classic smoky, I’d use a black pencil liner. Apply it close to the upper lash line, then immediately blend it upward into the dark eyeshadow with a small smudge brush. On the lower lash line, run the same pencil along the waterline and smudge it slightly underneath. This connects the upper and lower eye and gives that wrapped-in-shadow effect.
If your eyes are smaller or close-set, keep the lower liner to just the outer half. Full lower liner on certain eye shapes can make them look smaller, which is the opposite of what you want.
Mascara goes on last
Do all your eye work first, then mascara at the very end. This way if anything flakes or smudges during the shadow application, you’re not dragging it through mascara and making a mess. Coat both top and bottom lashes.
False lashes are optional but they do something for this look that nothing else replicates. A wispy half-lash on the outer corner adds drama without looking overdone. If you’re new to falsies, the outer-corner-only approach is much easier to apply than a full strip.
Keep the rest of your face simple
This is the rule people ignore and then wonder why the look feels like too much. Smoky eyes are the main event. If you’re doing a full smoky eye, your lip should be nude, sheer, or at most a muted pink. A bold red lip with a heavy smoky eye works in editorial photos and almost nowhere else in real life.
Skin can be dewy or matte, but keep blush soft. A bronze or warm glow works well. Heavy contour with a smoky eye competes for attention and both lose.
Fix fallout before you do anything else on your face
Dark eyeshadow falls. It’s just what it does. Do your eyes first, then tap away any fallout from under your eyes before you apply foundation or concealer. Some people do their eye makeup before their base for exactly this reason.
A piece of tape placed just under your eye during the shadow application catches most of the fallout and peels off cleanly. Sounds like a faff, but if you’re wearing light-coloured foundation it saves a lot of time.
The things I got wrong for years
Using only one dark shade: no depth, no dimension, just a flat dark lid. Three shades or bust.
Starting too dark, too fast: build up gradually. You can always add more. Taking it back is much harder.
Skipping primer: it creases without it. Every time.
Not blending the lower lash line into the upper: they have to connect at the outer corner. If they don’t, it looks like two separate things happening on your face.
Pairing it with a bold lip: just don’t. Not until you’re very confident with the look and you know your face well enough to pull it off.
The actual short version
Prime your lids. Use three shades. Blend until you can’t see the edges. Smudge the liner. Mascara last. Keep the rest of your face simple.
The first time takes practice and the second time is noticeably easier. By the third or fourth time you do it, the blending becomes muscle memory and the whole thing takes maybe fifteen minutes. It’s one of those looks that feels harder than it is until suddenly it doesn’t.